 Wondering how to auto-inflate truck air bags? Here’s how we do it…Ever since I wrote about how to install LoadLifter air bags on our Dodge Ram, I’ve been extremely happy with the results. Our truck has supported the weight of our fifth wheel much better, and the Air Lift air springs have provided a safer, more comfortable ride when hauling the trailer.
My only regret was not adding any sort of compressor system. And honestly, that’s why I rarely (if ever) deflated the bags—which has always caused a bit of a rough ride when not hitched up.
Then I met some techs from Air Lift at the 2016 SEMA Show and was excited to learn about the SmartAIR II Automatic Self-Leveling System for Air Lift air springs. This kit will sense the weight of the trailer on the truck and automatically inflate and deflate the air bags accordingly. As Rene said, Wow! What a difference…
For More Information:
Auto-Inflate Truck Air Bags with Air Lift SmartAIR II Self-leveling System
The first thing that struck me about the SmartAIR II system was its simplicity of design. And the install really wasn’t that difficult. Check out our demonstration video below and read on for more helpful installation tips.
How it Works
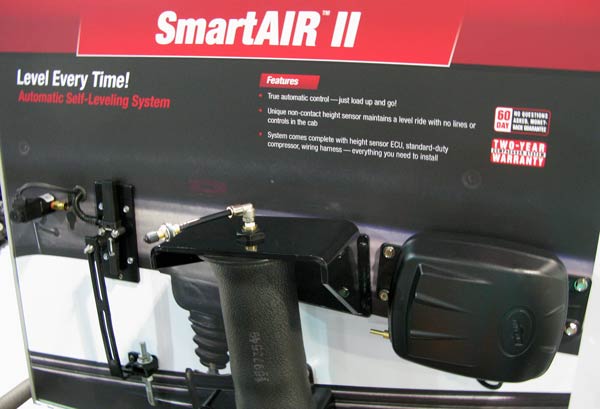
The SmartAIR II Automatic Self-Leveling System has three main components:
1. The Electronic Height Sensor (EHS) contains two pieces. A bracket with magnet mounts to the leaf spring, and the sensor mounts to the frame of the truck. When the trailer is hitched up to the truck, the bed will lower under its weight. This will lower the sensor below the magnet. When the trailer weight is removed, the sensor will rise with the bed and the magnet will move down.
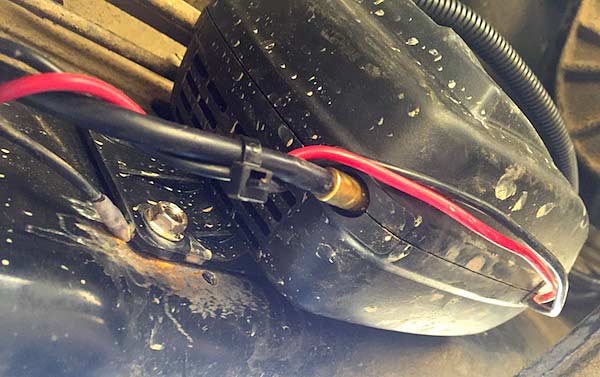
2. The Air Lift Compressor will automatically inflate the air springs when the EHS senses the weight of the trailer. Once level, the compressor will stop.
3. The Exhaust Solenoid will automatically deflate the air springs when the trailer is unhitched since the air added will raise the bed of the truck above its level point once the weight is removed.
The SmartAIR II system kit comes with everything you will need for installation. A wiring harness is already configured with a relay and fuse holders—fuses and all connectors are also included. All the wires are wrapped neatly together and there is ample length to reach from the battery and relay to the compressor and solenoid, and back to the EHS.
NOTE: The SmartAIR II system does not include Air Lift air springs, sold separately.
Read more Air Lift product reviews on Amazon.
How To Install SmartAIR II Self Leveling Air Spring Compressor Kit
If I can install the SmartAIR II system, anyone with fairly decent mechanical ability can! The installation guide is not incredibly comprehensive, but it does include a good color-coded diagram indicating approximate locations of all components, and the wiring and compressor line connection points.
Download SmartAIR II System Installation Guide Here
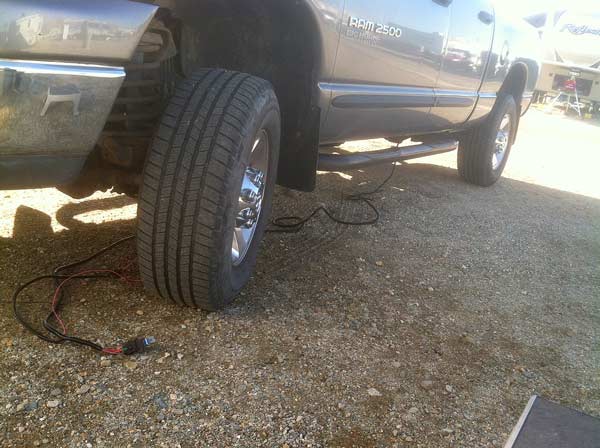
Got Tools? I installed the system in a couple hours using only a 12v cordless drill with nut driver, crescent wrench, wire strippers/crimpers, and a box cutter.
1. Determine Location of SmartAIR System Components
Depending upon your truck, one of the trickiest (but most important) steps may be deciding exactly where to mount the Air Lift compressor and exhaust solenoid.
TIP: Lay out the wiring harness under your truck. Place the Relay under your hood near the battery and stretch the wires all the way back to one of your already installed air bags. Connectors for the compressor and exhaust solenoid should be about 2/3 of the way back, under the truck bed.
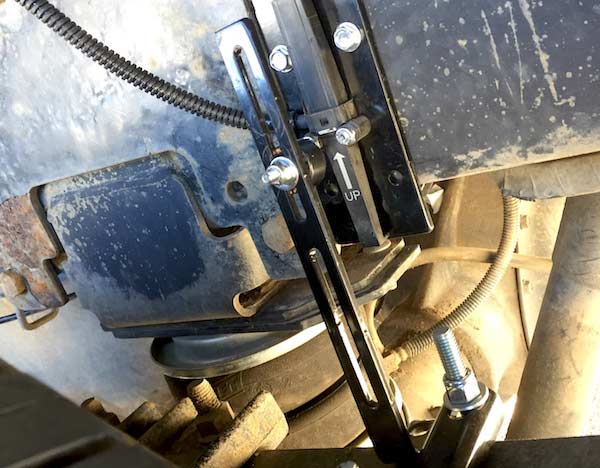
2. Mount the Electronic Height Sensor (EHS) and Magnet Bracket
Determine the location of the EHS sensor by loosely attaching the magnet bracket to the leaf spring. The bracket can be located behind or in front of the axle, but once attached, the magnet must be positioned 1″ – 1 ½” away from the sensor. Ensure that the Level line is visible through the center slot of the magnet bracket.
Assemble the EHS and mount it to the truck frame with provided self tapping screws, making sure the arrow points up. Do not connect any wires yet. Mount the bracket to the leaf spring. Position it so the center slot aligns with the EHS and attach the magnet so it is centered on the Level line.
Will the SmartAIR II work with a Fifth Wheel Hitch?
Yes. At least it works with our PullRite SuperGlide fifth wheel hitch. Air Lift recommends mounting the EHS magnet bracket as close as possible to the center of the leaf spring, but our hitch mounting plate prohibits that. I placed the EHS sensor next to the mounting plate and aligned the magnet bracket accordingly. It is not centered, nor perfectly perpendicular to the spring, and it is functioning fine.
3. Install Compressor and Exhaust solenoid.
The compressor housing is splash resistant, but does include vents to prevent overheating. Position the compressor so it is not exposed to excessive moisture. Use the compressor itself as a template for mounting. Scribe marks to indicate screw locations and pre-drill tap holes with a small bit. Fasten the attached ground wire with one of the screws beneath the compressor bracket. If necessary, grind off a bit of paint to ensure good contact
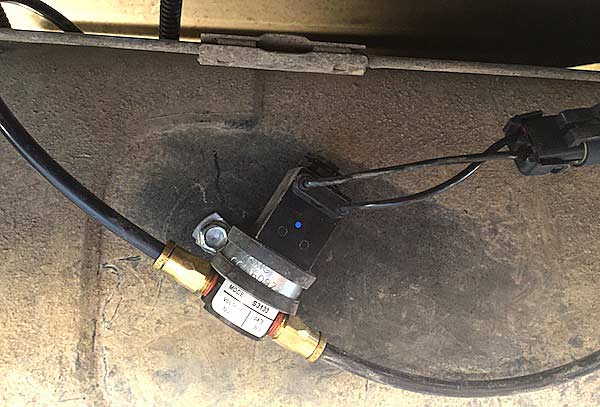
The compressor can be mounted in any position but must be mounted no more than 24 inches from the exhaust solenoid. And the solenoid must be mounted no more than 68″ from the EHS. I mounted the compressor on one side of the frame, and the solenoid on the other.
4. Route the Wiring Harness and Air Lines
Once the components are mounted, route the wiring harness throughout the system, securing it to non-moving parts every foot or so with the provided zip ties. Mount the Relay under the hood with enough wire remaining to reach the battery and fuse box. Connect the compressor, solenoid and EHS to the wiring harness, but wait to connect the battery.
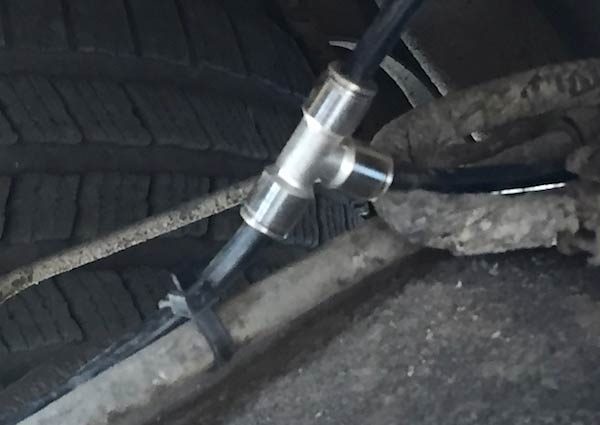
TIP: If you had previously installed air bags with fill valve(s), cut and remove the fill tube from the Schrader valve to one of the bags. Keep the other bag’s valve/air line intact. Attach the SmartAIR II air lines to the bag with the line you removed, and splice into the other one using the provided T connector.
Connect air lines to the air bags, compressor and exhaust solenoid. The compressor air line can be installed on either side of the exhaust solenoid.
5. Connect Power to the Wiring Harness
Once all components are wired and air lines are connected, connect the power lead (with the fuse holder) from the Relay to the positive terminal on your battery. Wait to insert the fuse. Connect the Ground lead to the negative terminal.

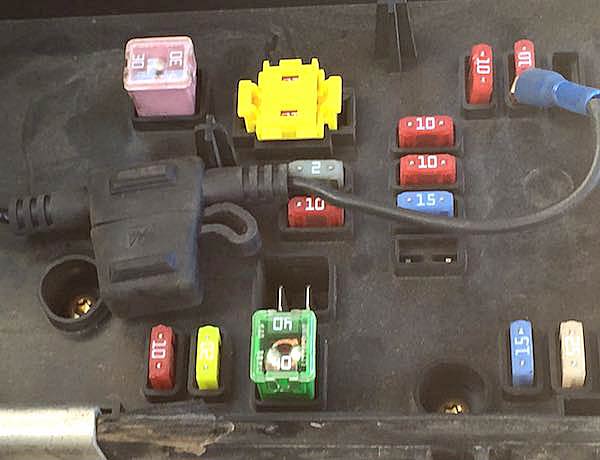
Locate and remove an ignition powered fuse in your fuse box. Mine was labeled “IGN PWR”. Attach the provided fuse tap—two sizes are provided—to the fuse and reinsert it. Connect the fuse holder to the wire from the relay and attach the other end to the fuse tap. Insert the provided fuses into the holders and the system is now powered and ready for testing.

5. Calibrate the SmartAIR II System
This is the amazingly simple part. The tech I met at SEMA was really excited to tell me just how easy it is to calibrate the SmartAIR II Self-Leveling System. He explained that manufacturers design vehicles to be level. So, to set the Level setting of the system, simply deflate the air bags and empty the truck of any excess weight. Then loosen the magnet on the bracket and position it so it is aligned with the Level line on the sensor. Tighten the magnet. That’s it!
6. Test the System and Check for Leaks
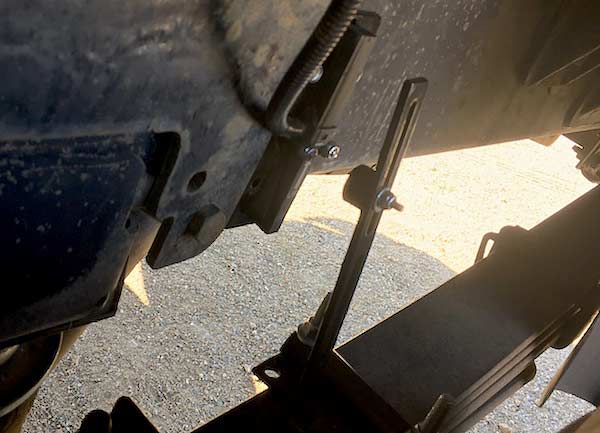
Turn the key in the ignition to power the system. Loosen and slide the magnet up the mounting bracket. This simulates weight being applied to the bed of the truck.
NOTE: The SmartAIR II system has a 30± second delay. This prevents the compressor from constantly engaging when driving over bumpy spots.
If you connected everything properly, the compressor will kick on after the delay, inflate the bags until the Level sensor reaches the magnet and stop. Lower the magnet on the bracket, and the exhaust solenoid will release air from the bags after the delay, stopping once the sensor magnet reaches the Level line again.
Turn off the key and deflate the air bags. Move the magnet back to the Level line and tighten it securely.
TIP: To check for leaks, apply a solution of soapy water to all air line connections. Inflate the air bags and look for bubbles.
I didn’t need soap. When I first tested the system, I watched the bags inflate and immediately heard a hissing sound. I fixed that leak by simply pushing firmly on the compression fitting. If leaks persist, remove the line from the fitting and cut off about 1″ with a razor, making a clean square cut. Reinsert the line firmly into the fitting and test again.
Any Questions?
We now feel a noticeable improvement in the comfort of our ride whenever hauling the trailer and driving about town, without the hassle of inflating and deflating the air bags every time we hook up and unhitch! (Did you catch that blooper in the video?)
Shop Air Lift products on Amazon and save!
Great review!
What is exactly the model of your Air Lift SmartAir kit? There’s at least 3 of them listed on Amazon (25490, 25491, 25415).
Thanks,
—
Vall.
Check out the video thumbnail above: 25490/25491 🙂
FYI: The 25491 is the dual path version of the same system, with two compressors, only necessary for major load balancing. Ours uses one compressor (25490).
Thanks for asking!