Anyone who has been following our adventures over the past 10+ years knows that I am a big advocate for our satellite internet dish. I’ve always postponed getting a cellular signal booster since that is our go-to solution when traveling in areas of poor (or nonexistent) cell coverage. I also love testing out new tech gear, however, and require reliable voice and data connectivity 24/7 everywhere we go. So, I was excited about the chance to review the weBoost Drive 4G-X RV cellular signal booster.
tldr; The weBoost 4G-X RV cellular signal booster, designed specifically for RVers, is easy to install and instantly improves signal strength for voice and data in areas of poor network coverage.
Read more weBoost reviews and save on Amazon.
I like reviewing products, but I’m not much for unboxing videos. Though I do promise you honest feedback about my user experience, with lots of photos and helpful installation tips. Coming from an ultra-critical marketing guy who worked the tech industry in his previous life, this should tell you something…
weBoost Drive 4G-X RV Product Review
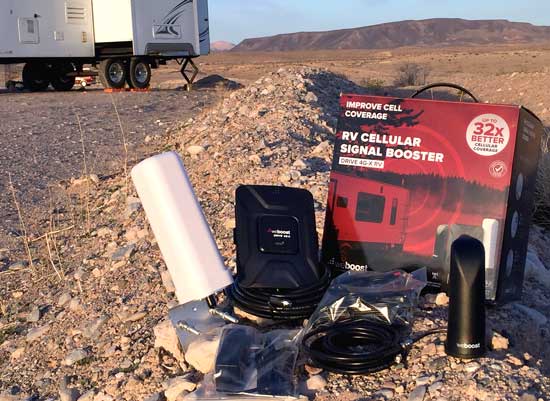
Many RV bloggers out there have reviewed weBoost products from Wilson Electronics – complete with unboxing videos – and written up favorable results. I needed to find out for myself, and discovered they had good reason. As a packaging designer, I was immediately impressed with the box components and documentation upon “unboxing” the weBoost Drive 4G-X RV.

Everything necessary for installation of all the system components was included in the various boxes, even the drill bit should you need to cut a hole for routing the exterior antenna cable inside your rig. All of the items were neatly grouped together according to clearly defined installation steps.
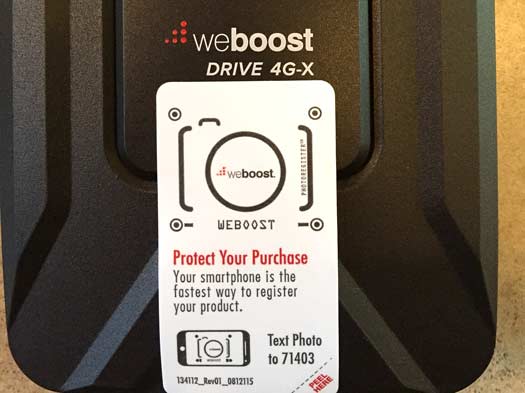
Next, I was impressed with how easy it is to register the product, something I usually forget to do when the reg card gets tossed aside. The weBoost Drive 4G-X booster had a label attached with a smartcode that allowed me to instantly launch the product registration page simply by scanning the image with my smart phone.
The weBoost RV system has three simple components that work right out of the box with no configuration required. The exterior antenna attaches to the outside of your RV with the included mounting bracket. That connects to the Drive 4G-X booster with a 20′ antenna cable. The booster then connects to the inside antenna with a 13′ cable.
How does the weBoost Drive 4G-X RV work?
The weBoost exterior 4G omni-directional antenna will receive any available signal from the local cellular network. The Drive 4G-X booster amplifies the signal, serving as a relay between cellular devices and the nearest cell tower. And the interior antenna broadcasts the stronger signal for better reception inside the RV to improve the quality and reliability of voice and data connections.
Drive 4G-X RV Field Test Results
I’m a results oriented guy, and the bottom line of any technical review like this is how well the product performs. You can read on below for installation steps and some helpful tips I discovered, but I’ll cut to the chase. Bottom line: the weBoost Drive 4G-X RV performs as promised.
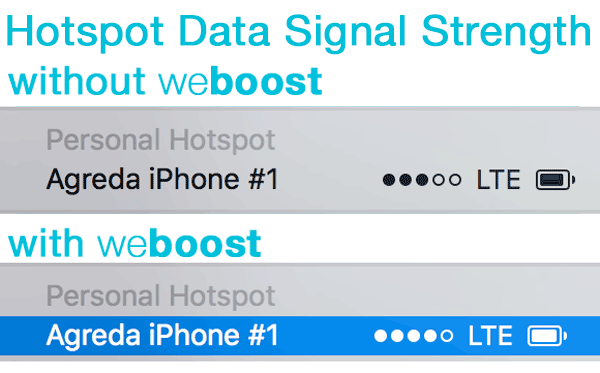
The easiest way to test any increase in cellular network signal strength, is to simply check the bars on your phone or mobile hotspot.
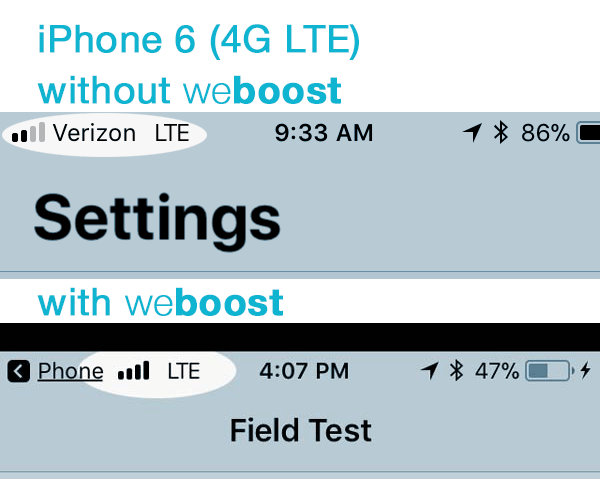
After powering on the weBoost we immediately noticed greater signal strength inside the RV with more bars indicated on our iPhones. I also noticed a better signal for cellular data on my laptop, when connected to the Personal Hotspot on our iPhone.
On Android phones you can check signal strength from the phone’s Network settings. The Field Test mode can be used on older iPhones (pre iOS 11) to view precise signal strength in decibels (dBm). I like specifics, so I dug up our iPhone 4s and dialed *3001#12345#* to view Field Test Results.
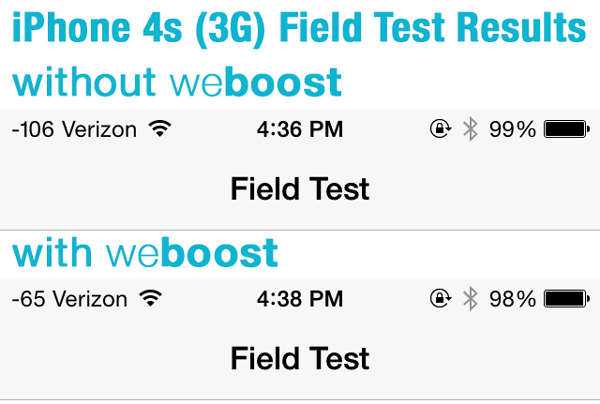
Our old 4s is 3G only and service has been deactivated, but the Field Test mode still displayed the decibel reading which clearly shows a more precise improvement in cellular signal strength.

Based on these tests, our cellular signal strength improved from Fair to Excellent for 4G LTE devices and improved 100x+ when using 3G after installing the weBoost Drive 4G-X RV. The real test will come the next time we are in a location with very limited cellular coverage. For now, I am very happy with the results weBoost delivers.
Read more weBoost reviews on Amazon.
weBoost Drive 4G-X RV Installation Tips
Before installing your new weBoost Drive 4G-X RV, determine the location of each component. Lay out the cables or measure carefully to ensure they will reach each other from your intended install location.
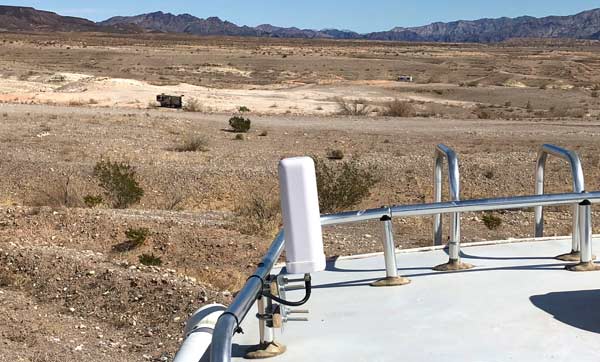
STEP 1: Mount the outside antenna.
The weBoost exterior antenna is designed to attach easily to an RV ladder or railing support post. This is the first and only real challenge I discovered when installing mine. I wish the antenna came with alternative mounting options, since I was forced to locate it near the rear of our trailer’s roof – the only location most RVs will have any sort of ladder/railing.
I would have much rather preferred to mount the antenna closer to the existing cable entry point I used, to avoid running the long cable all the way back our roof to the ladder railing. Aside from that, the bracket provided did not fit our 1″ ladder rail tubing.
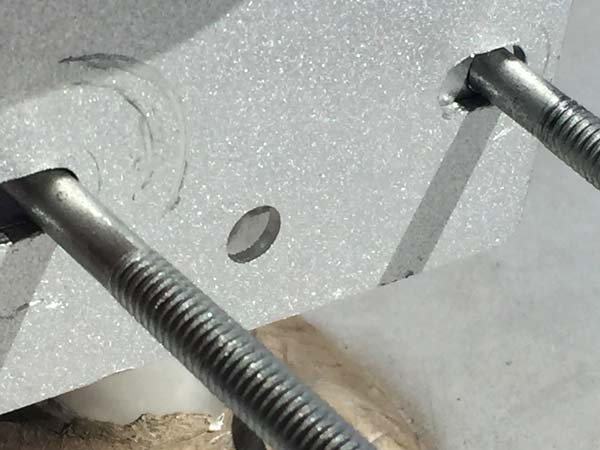
TIP: The U-bolts are not threaded far enough to securely tighten around a 1″ tube. They will only fit larger tubing as designed. Add a spacer to fit smaller tubes.
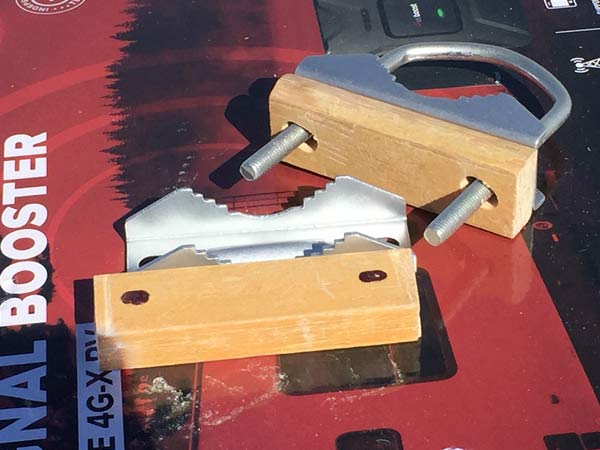
This was annoying, but easy enough to fix by adding a spacer between the pole bracket and mounting plate.

This allowed the nuts to securely tighten down on the mounting bracket bolts.
STEP 2: Route cable through roof.
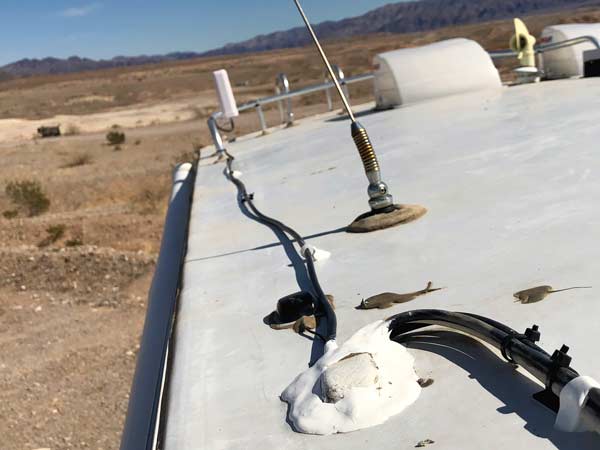
Rather than drill another hole in our roof, I chose to route the cable through an existing access point drilled when installing our satellite internet system. I do not recommend routing the antenna cable through as slide-out, using the slide gasket as a seal. This option is illustrated in the weBoost manual, but makes no sense to me since there would need to be enough slack in the cable to compensate for the slide position. If necessary, a new hole can be drilled with the included hole-saw drill bit.
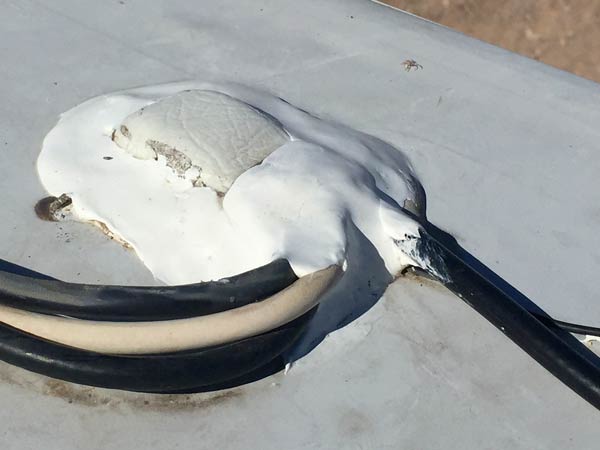
After attaching the outside antenna, I removed our existing cable entry cover, inserted the antenna cable with our satellite cables and replaced the cover. An ample amount of Dicor lap sealant ensures a watertight seal. In the above photo, the weBoost antenna cable is on the right, with three RVDataSat cables to the left. The smaller wire is for our Sirius XM satellite radio.
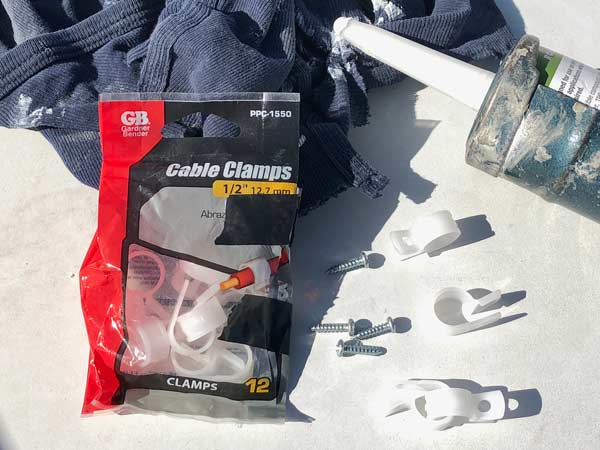
TIP: The adhesive cable mounting brackets intended for use with the weBoost antenna did not work well on our rubber roof. These will likely work fine on an aluminum or fiberglass roof. But even though I thoroughly cleaned the area where the mounts attached, the adhesive released from the rubber roof too easily. Luckily I had some cable clamps and screws remaining from our satellite system install. And any full-time RVer should always have some Dicor lap sealant on hand!
STEP 3: Mount booster.
The weBoost 4G-x RV easily mounts to any interior wall of your RV. The best location is inside a cabinet near a power source. While the booster can simply be plugged into a 110v outlet, I chose to mount the booster with our other networking equipment near the radio for easy access to DC power.
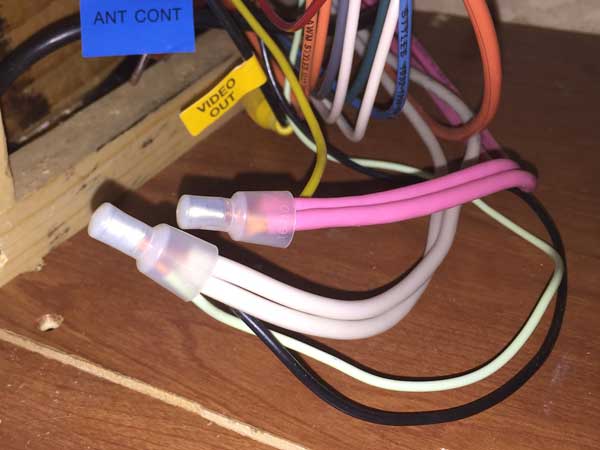
I really like how the weBoost comes with two power adapter options, for either plugging in to AC power or hard-wiring into the RV’s 12v power circuit. I installed an AC outlet in our networking cabinet, but chose to use the 12v wiring option to avoid having to use the inverter to power the weBoost when boondocking.
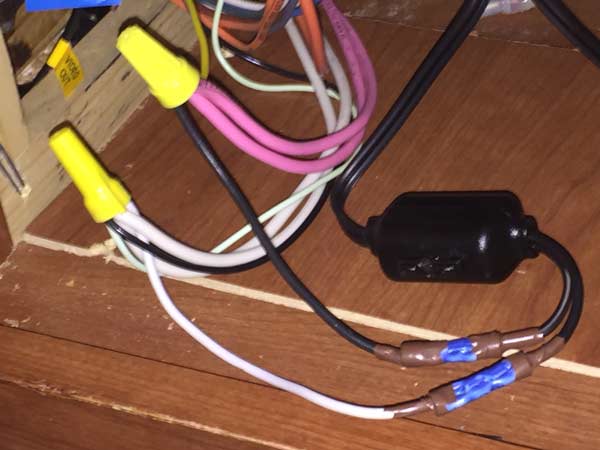
The leads at the end of the weBoost DC power supply were too short for my liking. I need to be able to access the fuse, but the leads would not easily reach the power source inside our radio cabinet once closed back up. I added short jumper cables to remedy the situation.
NOTE: The 12v power adapter includes an inline fuse but it is not switched, and the weBoost does not have an on/off switch. Keeping the weBoost powered on when connected directly to 12v power will put a drain on the batteries. I plan to simply keep the weBoost unplugged when it’s not in use.
STEP 4: Connect cables and inside antenna.
Determine the best location for your inside antenna, and route that cable from the booster to its location. The weBoost manual suggests the best location is to just have the antenna sitting atop a counter centered in your RV. We didn’t want anything else taking up counter space, and didn’t care for any more exposed cables.
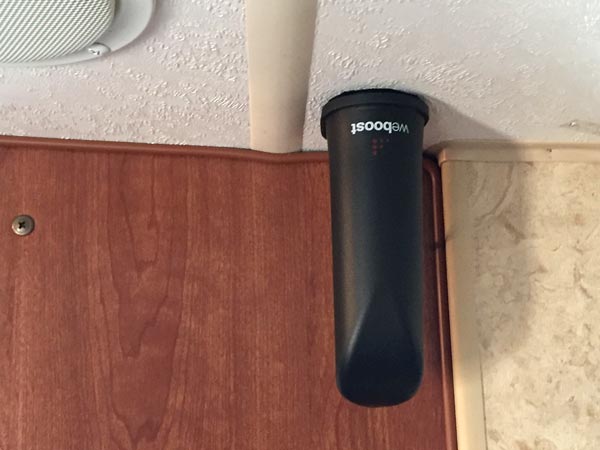
For best reception anywhere in the RV, and to keep the inside antenna out of the way, I mounted it to the ceiling. I used industrial strength Velcro to avoid drilling any holes in the ceiling.
NOTE: It is important not to locate the inside antenna near the outside antenna. While weBoost does not offer any specific measurements, the manual states that horizontal distance between the two antennas typically requires a shorter separation than a perpendicular separation. Why? Antennas connected to a booster each create a sphere of signal. When these spheres overlap, a condition called oscillation occurs. This oscillation creates harmful electronic noise that can cause the booster to shut down to prevent damage. To keep these signal spheres from overlapping, maximize the distance between the booster and the antennas.
The weBoost has a status indicator light that will flash red if oscillation is sensed. With a green light, you are good to go. No further configuration is required once the hardware is installed.
Conclusion
The weBoost Drive 4G-X RV will boost the cellular signal for any carrier for every phone. Any device within range will have the benefit of boosted reception automatically. The weBoost works with any cellular device. Mobile phones, tablets, hotspots and any other device that uses a cell signal will get boosted performance with weBoost. Conserve mobile device battery power with weBoost. Your phone won’t use additional energy required to find a signal as it hops towers or roams different networks. Installation is simple and the system is plug and play – weBoost devices automatically adjust to provide optimal signal strength, so you never have to touch it again.
Read more weBoost reviews and save on Amazon.
Any questions?
how much distance should there be between the inside and outside antennas?
Thanks,
John
You’d have to check the specs for exact details, I no longer have our box and do not recall any specific measurements – only that vertical distance is more important than lateral. Ours indoor antenna sits approx. 6′ down and 12′ away from the external antenna mount.
Curious if I mounted the external antenna to the ladder of the RV and kept the internal antenna loose inside, could I move the internal antenna inside of our truck for the same boosted signal on travel days (we have a fiver rig)? Thanks.
That wouldn’t exactly work since both antennae and the booster are all connected via cables. If the internal antenna is close to the front of your rig,however, you may be able to pick up the boosted signal from your truck.
Can you hook the antenna directly to the existing tv coaxial cable rather than using the supplied ecternslcable. And than just simply hooking the internal cable bo I step coaxial directly to where a tv would normally hook up to?
Good question Darin, if I follow you…which antenna?
The kit comes with an RG-6 Ultra Low-Loss Cable (N-Male to N-Male) with F-female connectors for connecting the external antenna. I suppose if you have a coax input on your roof, you may be able to connect directly to the internal cabling of the RV, and then connect another cable for the booster near the inside jack. I do not, however, have a spectrometer–nor would I know how to read it–to determine if there would be any applicable signal loss by doing so.
The internal antenna, on the other hand, uses a smaller cable and SMA-female connectors.
I bought this product last year and I think it’s great. I’m a full timer using Verizon for a hot spot. In the past year or so I have noticed that Verizon signal strengths have weakened dramatically. I stop in places that used to have strong signals and now they are much weaker. The We Boost can triple the upload and download speed. Very happy with the product. I enjoy your site.
Jim
Thanks for the feedback!