I used to have a love/hate relationship with our old Datastorm F2 satellite internet dish from MotoSat. I love the RVDataSat 840 system we have now. Hate is much too strong a word, but a certain amount of technical expertise, critical thinking skills, and patience, are still required when troubleshooting connectivity issues.
DISCLAIMER: If you are an InstaSat customer and/or have an RVDataSat satellite internet dish, please contact MobilSat for technical support. The information provided here relates to the RVDataSat 840 (DataSat 84CM) with ACU-1 controller and may or may not apply to other similar satellite internet and TV systems manufactured by RF Mogul. Proceed with caution.
Troubleshooting Satellite Dish Bad Skew Count Error
After receiving “Bad Skew Count” errors when calibrating our dish, and spending several days working to resolve the issue, I thought I would share some steps I took to troubleshoot the skew motor, count sensor, mount wiring, and controller.
Pop Quiz: What’s wrong with this picture?
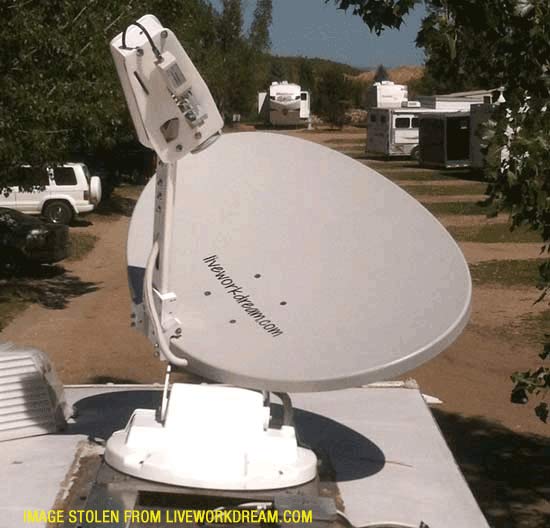
Answer: Absolutely nothing, except for the fact that the dish stalled out in this position when attempting a search or calibration.
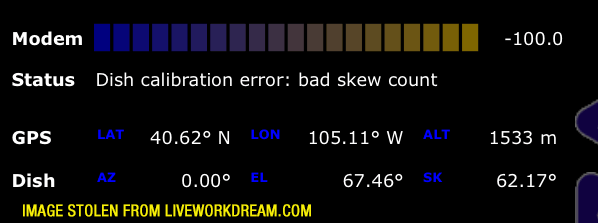
What causes bad skew count errors?
Short Answer: Who knows!? Long Answer: The bad skew count error and/or motor overcurrent error can be caused by various different factors – a physical obstruction (e.g.; binding control cable), bad count sensor, wiring fault, electrical interference or power spikes, bad motor, corrupted software, malfunctioning controller, gremlins…
Troubleshooting Steps to Identify and Resolve Bad Skew Count Error
Here are a few steps you may be able to take when troubleshooting a bad skew count error on the RVDataSat 840, which I learned from the experts at RF Mogul. They should know, they built it.
Check all Wiring connections
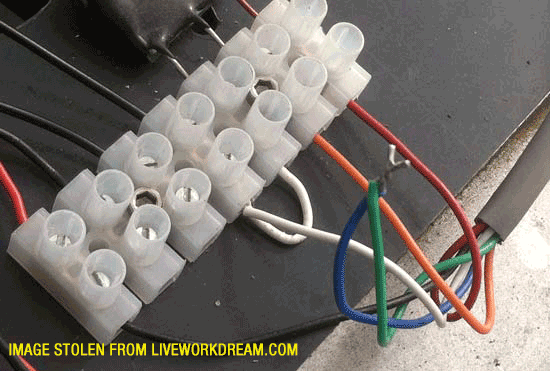
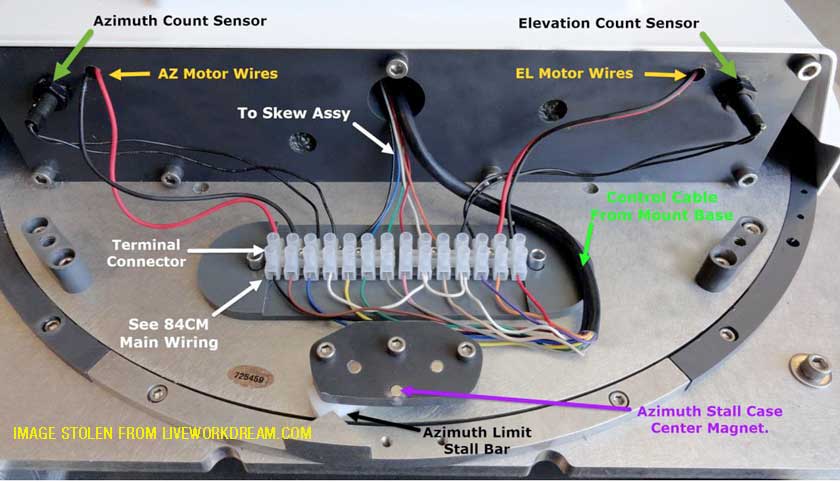
Remove the green control cable connector from the back of the ACU-1 Controller. Ensure that all wires are seated firmly, and that the retention screws are contacting the bare wire, and not the colored shielding.

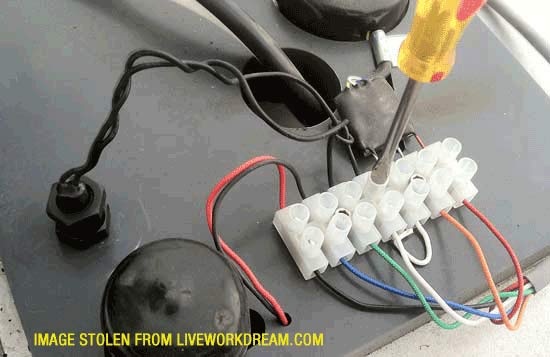
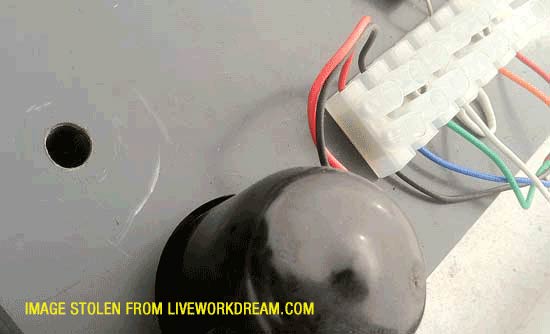
Stow the dish and remove the back cover to expose the skew motor assembly. Check all wiring connections on both sides of the white junction block. Remove and reinsert wires – one at a time – for best results. Remove the cover at the base of the mount to check all primary control cable wiring connections.
Confirm that no wires have become bound, brittle, broken, bent or pinched anywhere. Inspect the location where the control cable enters your rig through the ceiling. If you have a metal roof, pay special attention to make sure no sharp edges have cut any of the wires.
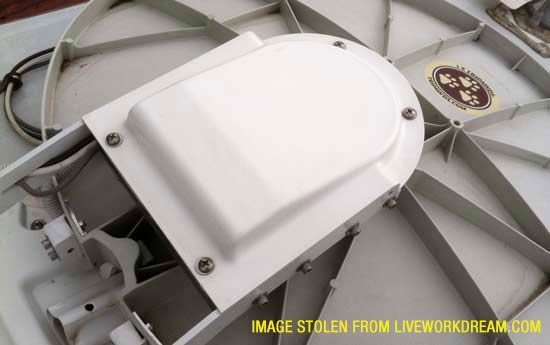
Inspect Skew Motor and Wiring
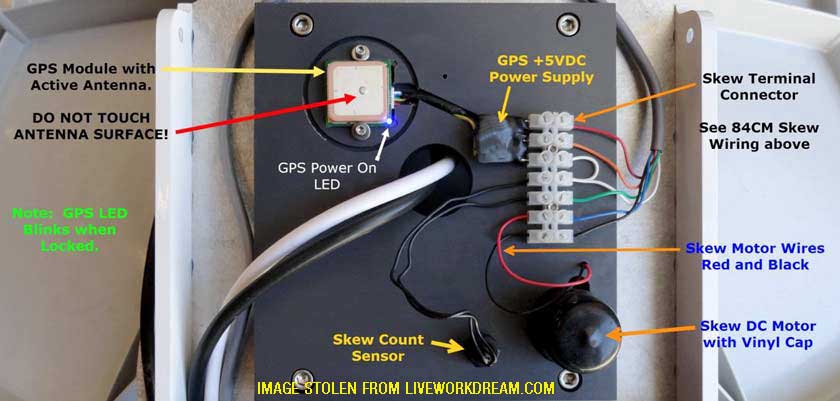
Remove the black vinyl cover from the skew motor located next to the skew assembly wiring junction block. Inspect motor to confirm solid connections of wires to motor. The black and red motor wires run through a groove in the assembly base plate. Slide the wires to ensure they are passing freely through this groove and not pinched under the mounting plate. Any contact of any wire to the metal surfaces of the mount can cause a fault.
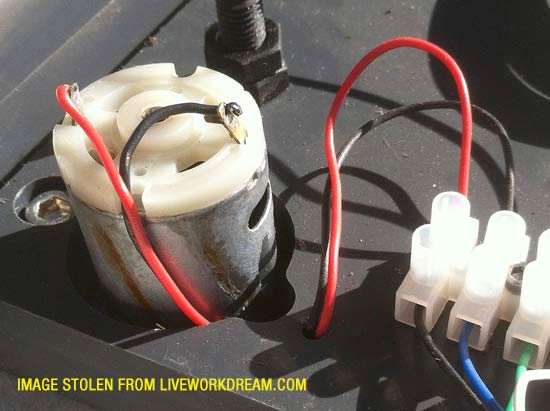
Check Continuity of Skew Motor Wires
Any drop or spike in voltage to the skew motor may cause bad count or overcurrent issues. Use a multimeter to check continuity of the skew motor wiring. Remove the green control cable connector from the ACU-1 first!
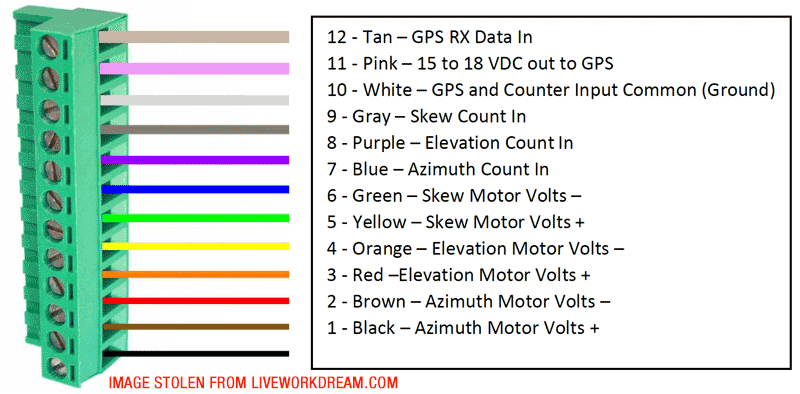
Remove the #2 (blue) and #3 (green) wires from the white junction block at the skew assembly. Tie these two wires together to create a closed circuit. Test for continuity from the control cable connector using the #6 (green) and #9 (grey) wires. Coming out of the controller, the green wire powers the skew motor and the grey wire is for the skew count sensor.
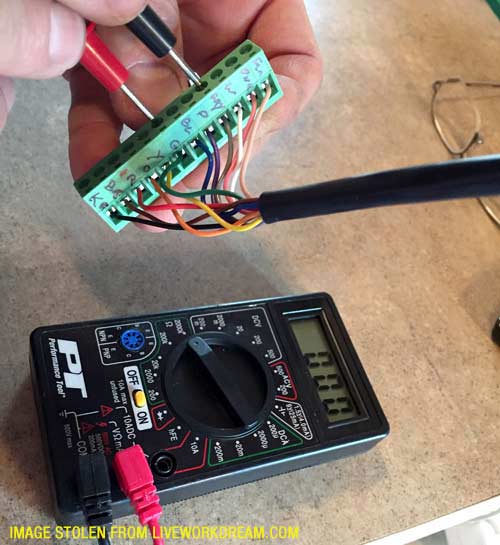
Yes, these wire numbers and colors are correct. The green and grey wires run from the controller to the primary wiring junction at the base of the antenna mount. From there, the green and blue wires run to the skew assembly junction box. You want to test the whole circuit. NOTE: Be sure to replace blue and green wires in corresponding locations of skew assembly wiring junction box before restoring power to the system to avoid controller damage!
So far so good? You may have a bad motor count sensor…
Test or Replace Skew Motor Count Sensor
The skew count sensor is a small threaded shaft with two nuts, located next to the skew motor. Remove the two black wires connected to the sensor from the wiring junction block. These two wires can be re-connected in either location. To avoid twisting and binding, disconnect the wires before removing the sensor, and reconnect them after re-installing the sensor. Loosen the upper locking nut of the sensor, and then the retaining nut. Unscrew the sensor carefully.
NOTE: The sensor can be tested by using your multimeter to check continuity of the connected wires and passing a magnet back and forth across the sensor tip. But honestly, it is a $3.00 part available from Digikey (Magnetic Sensor P/N: 59065-010-ND), so I just replaced mine. TIP: Shipping will cost more than the sensor, and the same sensor is used for all three motors in the RVDataSat mount (azimuth, elevation, and skew). Had I known this before ordering, I would have purchased three to have the spares.
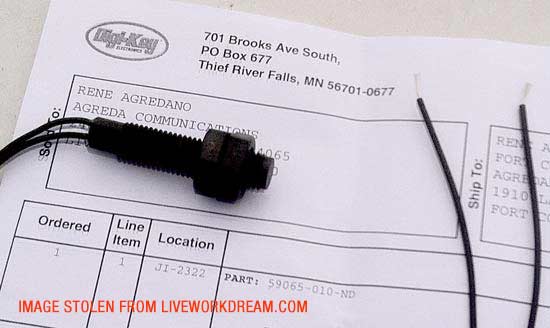
Replace the motor count sensor by first moving the nuts up the sensor shaft toward the end with the wires connected. Insert the sensor into the threaded hole. Gently tighten the sensor by hand until it stops, and do not force it any further. Back off the sensor 360º by turning it back one full rotation. Tighten the lower retaining nut by hand. Tighten the top locking nut.

Do not over-tighten these nuts, the sensor and nuts are plastic that can easily be damaged. Re-connect the black sensor wires to their previous locations in the wiring junction box. Replace skew assembly cover, re-insert green control cable connector into ACU-1 and restore power to the system. Perform dish calibration.
Unfortunately, these steps did not resolve our issue. After one successful dish calibration, the skew motor threw an overcurrent error when attempting to search. Now what!?

Eliminate Software Issues
To rule out corrupted software being the cause of any errors, reinstall current firmware for the DataSat ACU-1 controller. This is a relatively simple procedure, but be sure to copy all your system settings before starting to ensure you can restore them if any settings are lost in the process.
Contact MobilSat or RF Mogul for a copy of the current controller firmware. They will provide you with two files via email, a .hex file and a .zip archive. Format a USB flash drive (FAT32) and save both files to the root folder. Insert the flash drive into the front of the ACU-1 and turn on the power. The ACU-1 will automatically install the software and reboot the system.
FYI: The ACU-1 stores its system software on an SD card inserted into the back of the unit. Make sure this card is firmly seated in the slot whenever troubleshooting controller issues. Every time the system starts up, it pulls software from the SD card into RAM. There is no internal hard drive. Depending upon environmental conditions, the connections can become corroded, or the cards can become corrupted over time. (Spoiler Alert: This was part of our problem all along!)
After all this, our errors persisted, but were very sporadic with no identifiable pattern to pinpoint the exact cause.
If all else fails, go see the experts.

RF Mogul Saves the Day
The RF Mogul factory is located in Salt Lake City, which happened to be a convenient stopping point on our way from Colorado to California. The timing just happened to work out perfectly, so we decided to stop by for some expert help. After sending in our controller for testing, and learning that it checked out OK, it made sense to save on return shipping by paying a visit to pick it up and work with their techs to find and fix our skew error issue once and for all.
To make a long story short, our random bad skew count errors were likely caused by a corrupted SD card and/or installing beta versions of controller software while troubleshooting. Either that, or it was those pesky gremlins.
Additional Help for Troubleshooting RVDataSat Issues
There may come a time when you need manually move your antenna with no power to the controller. For whatever reason, you can use a standard 9v battery or the 12v battery from a cordless drill to move the mount following these instructions.
- Power off all electronics (Controller, Modem & Router).
Caution: Failure to power off the electronics prior to unplugging any cable may result in damage to the electronics or their associated power supplies. - Remove the green molex connector from the back of the ACU-1 controller.
- Using a small standard screw driver, remove the necessary wires from the molex connector (Motor Wires #1 – #6: Black & Brown, Red & Orange, or Yellow & Green).
Caution: Failure to raise the antenna in Elevation sufficiently to raise the arm off of the stow plate will result in damage to your antenna and your vehicle. - Connect the corresponding wires to the battery terminals to move the antenna as indicated below. All movements are relative to standing behind the dish.
- Restore all wires to the appropriate slots in the molex connector.
- Reseat the molex connector into the controller.
RVDataSat 840 Manual Motor Operation:
Elevation (Red & Orange Wires):
a. Red to Positive (+), Orange to Negative (-) = Elevation UP
b. Red to Negative (-), Orange to Positive (+) = Elevation DOWN
Azimuth (Black & Brown Wires):
c. Black to Positive (+), Brown to Negative (-) = Azimuth Clockwise
d. Black to Negative (-), Brown to Positive (+) = Azimuth Counter-Clockwise
Skew (Yellow and Green Wires):
e. Yellow to Positive (+), Green to Negative (-) = Skew Counter-Clockwise
f. Yellow to Negative (-), Green to Positive (+) = Skew Clockwise
A Look Under the Hood of the 84CM
Refer to the following photos and diagrams for help identifying RVDataSat mount wiring and components. (Click images to enlarge.) Source: RVDataSat manual and wiring diagram documents.*
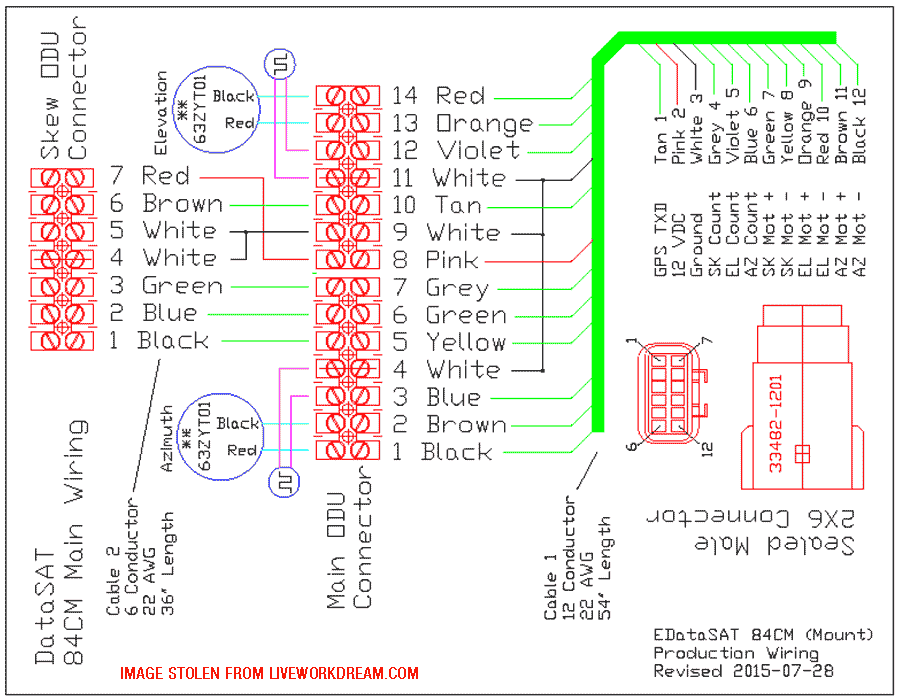
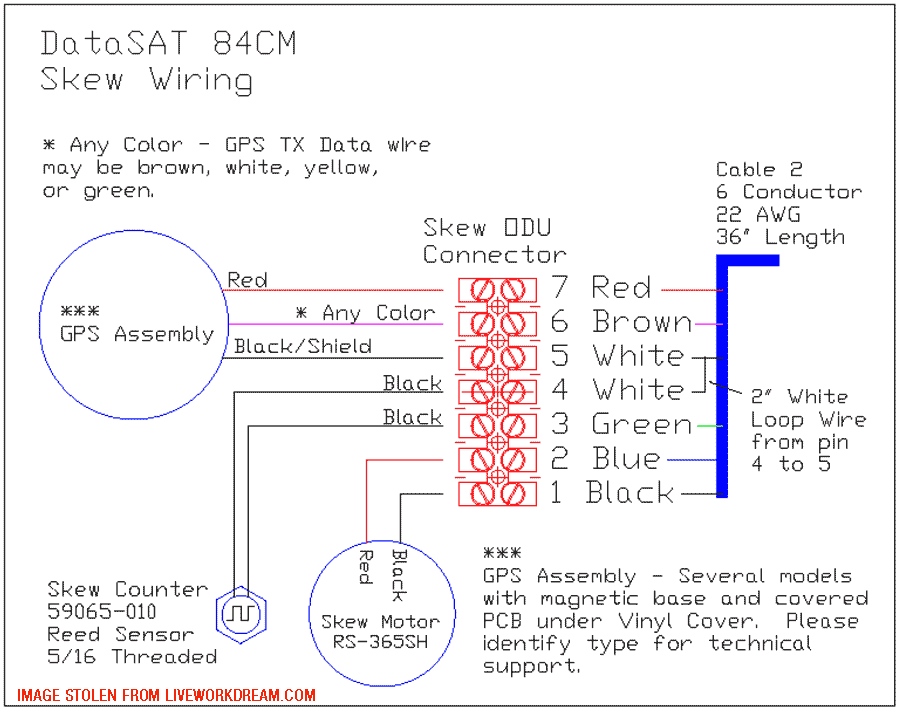
*Download RVDataSat Manual and Wiring Diagrams:
RVDataSat840 Operation Manual (2016, v.2.0)
DataSat 84CM Quick Wiring and Setup Guide
DataSat 84CM Wiring and Diagnostics
DataSat 84CM GPS Diagnostics and Repair
Epilogue
I did benefit from this experience by gaining a much greater understanding of the RVDataSat 840 satellite internet system and ACU-1 controller. I also got another tour of the RF Mogul assembly line, along with some detailed tutorials about how the 840 is put together. I’m confident I could now field strip the mount and replace any parts, if I ever had too – thanks to its simplicity of design, and the fantastic support team at RF Mogul.